
This functionality allows you to sign documents electronically remotely with full legal validity, in accordance with the European eIDAS regulation.
The eSiganture electronic signature is available in the Business and Enterprise versions of Docuo.
Set up an eSignature electronic signature process
To perform the configuration you must be a Docuo administrator and start from a category that has a master file.
Step 1: Preparation of the signature workflow
In the “Process” step, at least three statuses must be defined for the document. For example:
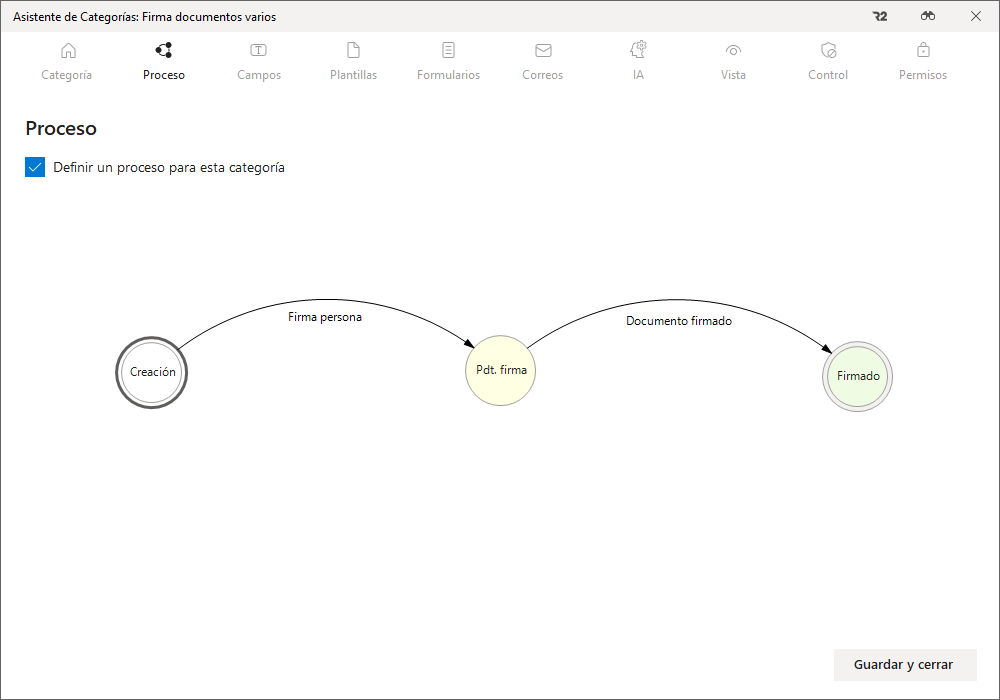
- “In creation”, where the document that you need to be signed by a third party is created.
- “Pending signature”, where you wait for the document to be signed.
- “Signed”, where you will have the document signed with the eSignature.
Step 2: Preparation of the fields for the signatory’s data
In the “Fields” step, at least the following data fields must be created:
- “Name and surname”, this is a text field where the name of the person who will sign the document is indicated.
- “E-mail”, of the document signatory.text type field – e-mail. It is necessary to be able to send you a web link where you can review and sign the document.
- “Mobile phone” , of the signer of the document. Text type field – cell phone. It is only necessary if you want to activate the validation by SMS text message in the signing process.
Step 3: Creation of the electronic signature form
It is created from the “Forms” step and allows you to sign the main file of documents in this category.
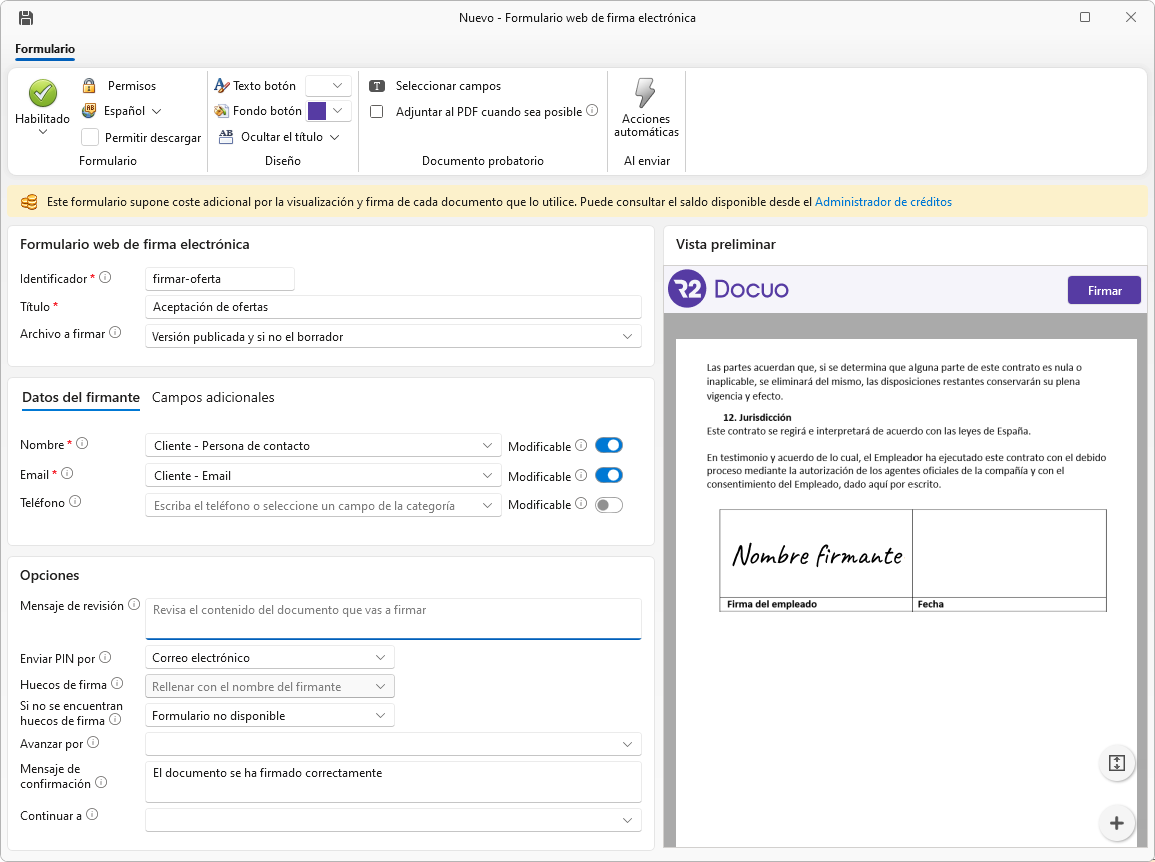
In the form configuration window we can adjust all the behavior of the signing process with several options. The most important are:
- In “Permissions”, we can determine in which states the form will be available and what messages are displayed when a user cannot sign the document because it is not in the right state.
- In“Signer data“, we must choose the fields Name, Email and Phone of the signer that we created in step 2. If you want the user to be able to enter or modify this data during the signature, you can activate the “Modifiable” check box.
- In“Additional fields“, it is possible to add other fields of the document that need to be filled in or edited during the signing process. If appropriate tags exist, these fields will be replaced in the document during the process.
- Under “Options – Send PIN by”, select the mode of sending the signature code (PIN): e-mail, SMS, or “Do not send PIN” to use the signer’s biometric trace instead.
- Under “Options – Signature fields“, specify how the signature fields should be filled in, whether the form should be filled in with the handwritten line or with the signatory’s name.
- In “Options – Advance by“, indicate the transition by which the process will advance when the signature is completed. In our example it would be “Sign (From Pending Signature to Signed)”.
- Under “Options – Continue to“, indicate to which web page the signatory should be redirected after completing the signing process:
Step 4: Creating the document template for signature
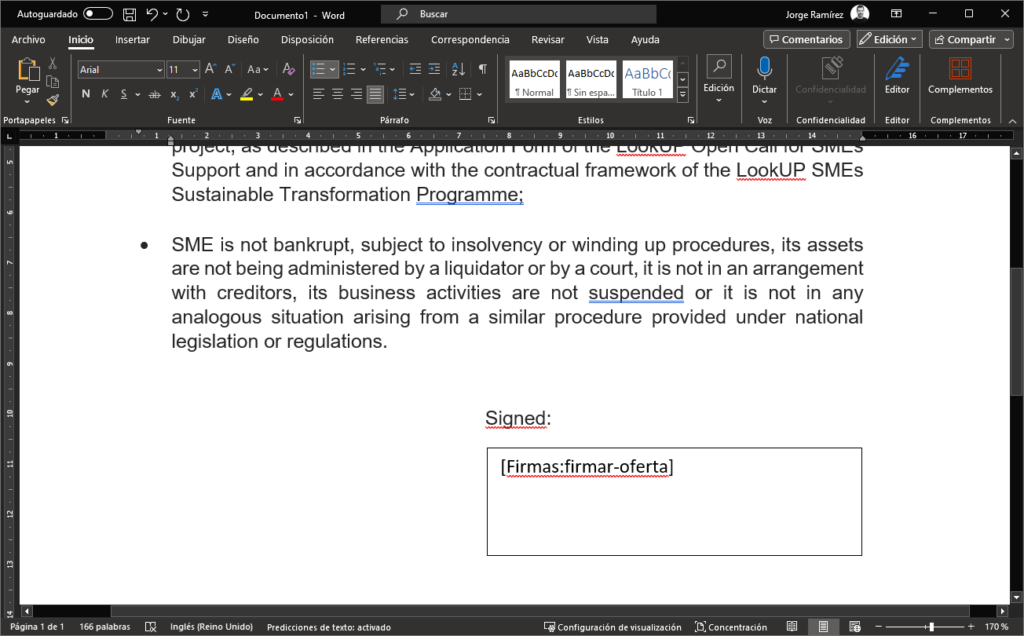
In the “Templates” step, use a Microsoft Word docx file in which you can add replacement labels and insert signature boxes. You can use an existing template document or create a new one.
Signature boxes (also called signature holes or placeholders) are rectangles located in the document where the signature stroke or the signer’s name will be drawn automatically.
If a document does not have a signature box configured, when the user has to sign, his signature will be printed at the end of the document.
To insert the signature box in a document, follow these steps in your template:
The signature box must be created in Microsoft Word as a text box from the “Insert” menu:

Next, in the “Text Box” action select “Draw Text Box” at the bottom of the pop-up menu:

You can then draw one or more text boxes (rectangles) anywhere in the document and specify where you want the user’s signature to appear.
Once the box has been created, you must tell Docuo the signature form that will populate that field. To do this, you must write a special label inside the replacement label. This label consists of the word “Signatures”, followed by a colon “:” and the signature form identifier, all enclosed in square brackets. In our example:
[@Signatures:sign-offer].
Step 5: Creating the signature request email
This is done from the “Correos” step. This email is used to inform a third party that they must sign the document and provide them with the access data to our form.
In our process, this email will be sent in the “Send” transition to the recipient of the “Signature Data – Email” field. The signature form link is an additional substitution tag that can be added to the email content.
You can easily find it under the “Link” button in the “Input Form” section:

How does it work from Docuo?
- Create a new document in the category and enter the email address of the signer. You can either enter their name and cell phone number, or let them fill them in on the form.
- “Generate from template” to prepare the document you need to be signed.
- Move to “Pending signature” and wait for the user to access the form and sign. When this happens, if we configure it in the form, the document will go to “Signed”.
What is the signature experience like on a desktop computer?
The recipient receives an email with the form link.
When accessing the link, if an optional security validation is configured for the form (password or two-factor authentication), it must be passed.
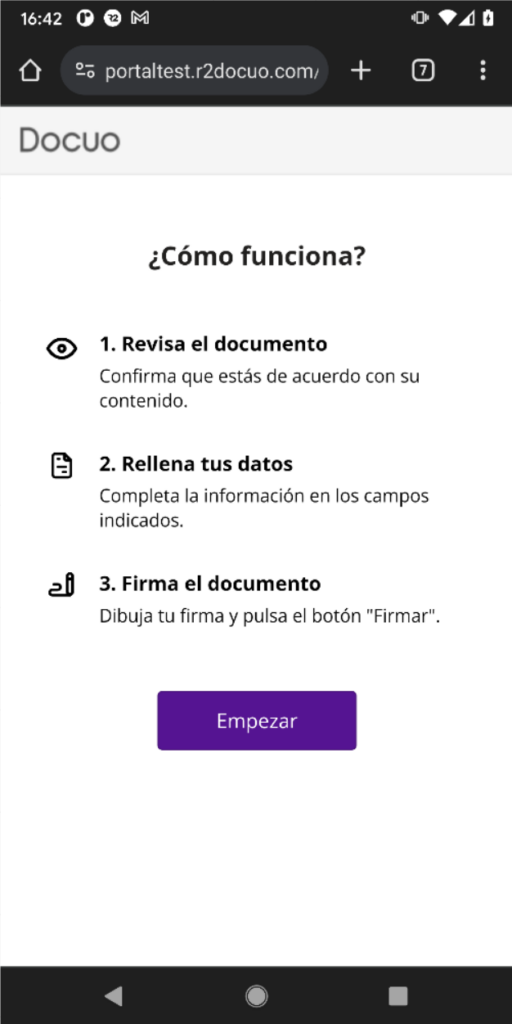
Otherwise, or once the authentication has been passed, a simple window will be displayed indicating the steps to be performed:

When the user clicks “Start”, a window for reviewing the document will be displayed:
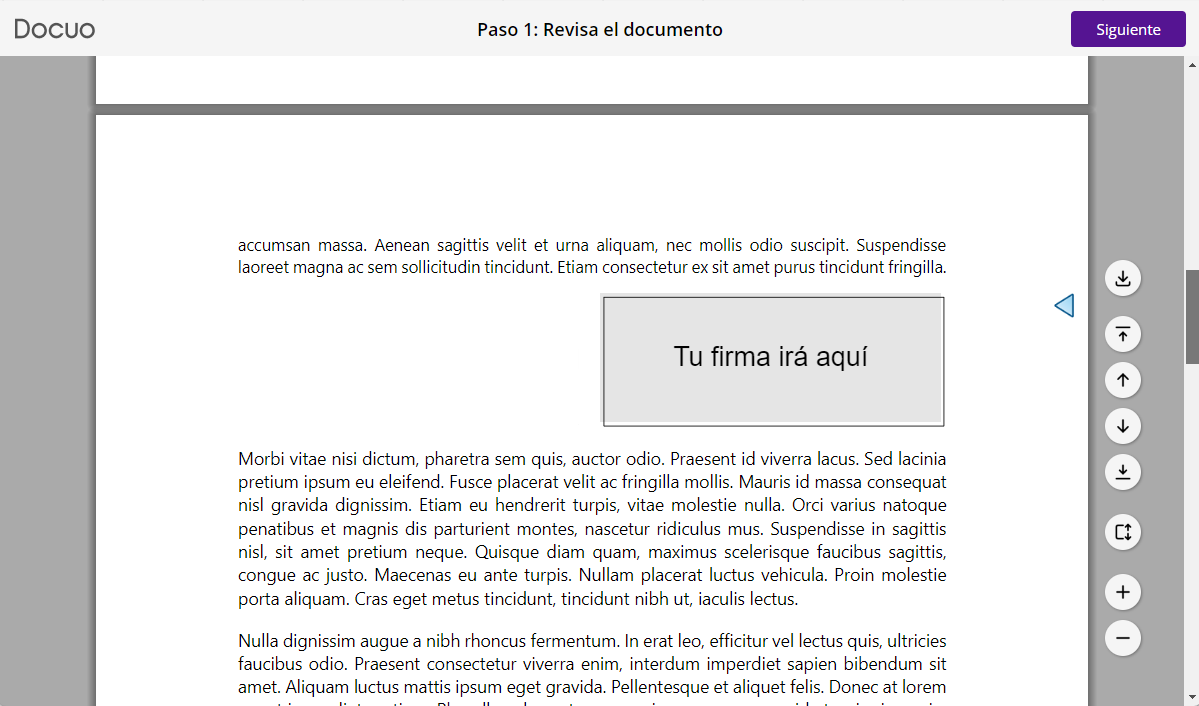
In the signature fields (if any), the legend “Your signature will go here” will be displayed.
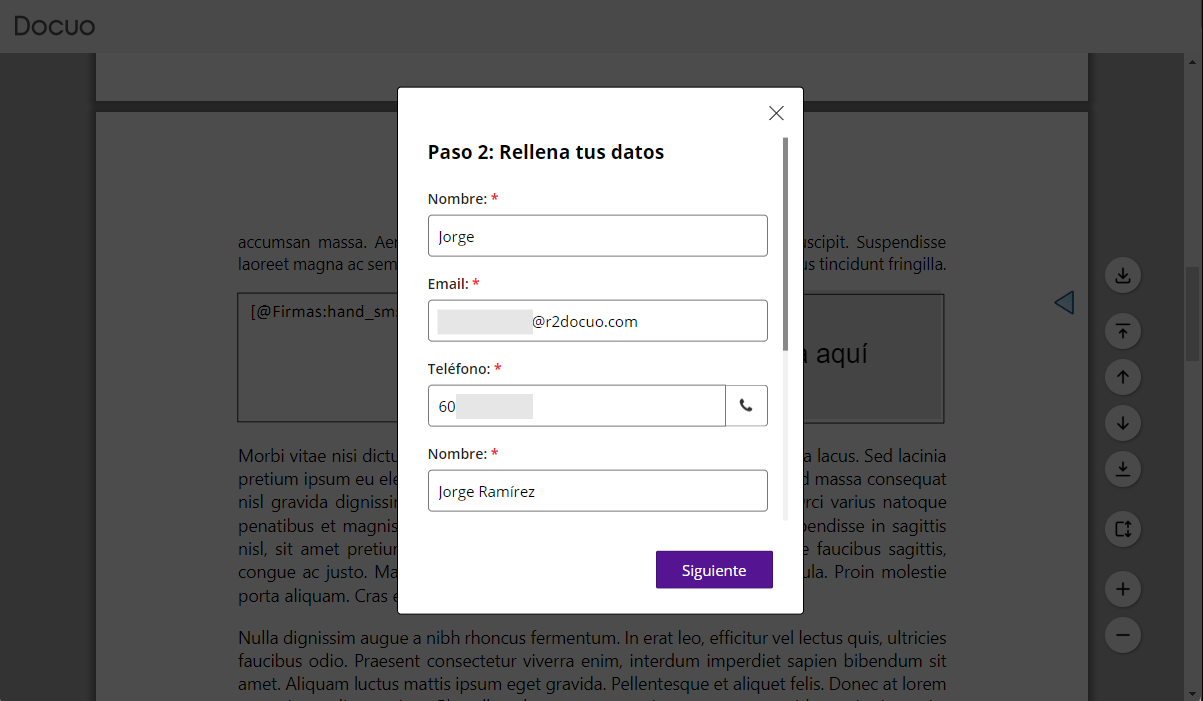
When the user clicks “Next”, if any of the signatory data or additional fields are configured as editable (optional), a window will be displayed where the user can view, enter or change them:
When the user clicks “Next”, he/she will be presented with the signature window where he/she can, depending on how the form has been configured, make a handwritten stroke or enter a PIN code. This example shows the handwritten stroke option:
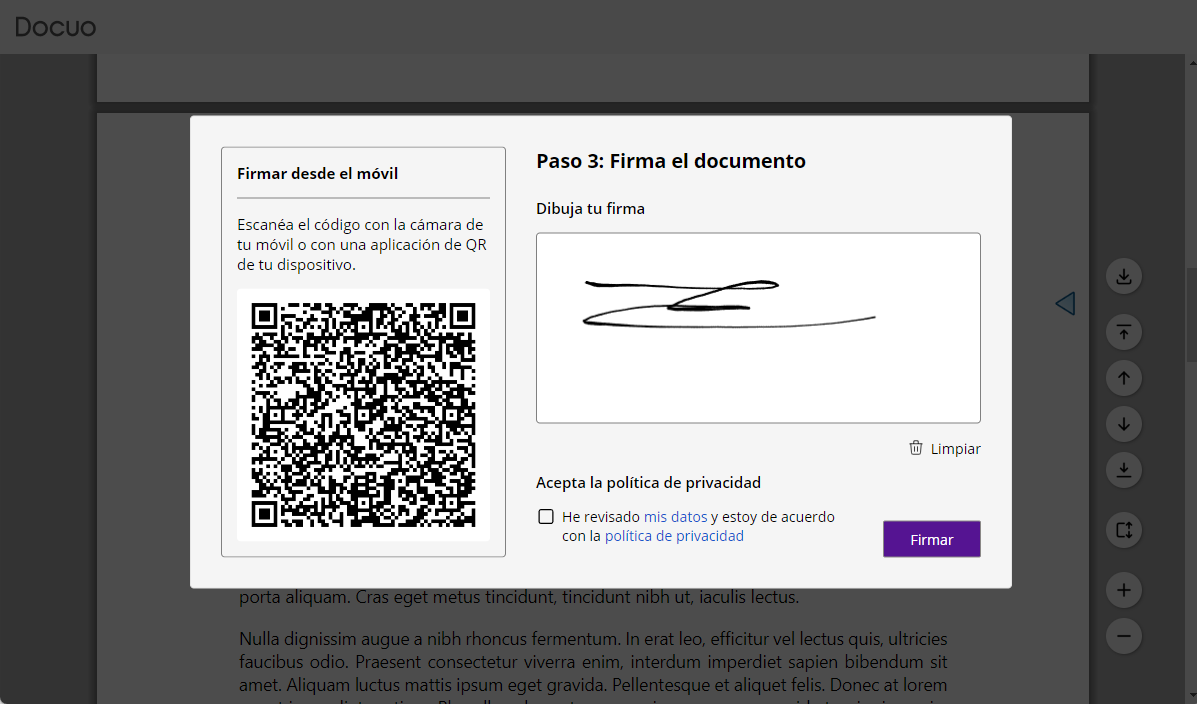
If desired, in the case of handwriting, the user can continue the signature process from a mobile device by scanning the QR code for this purpose.
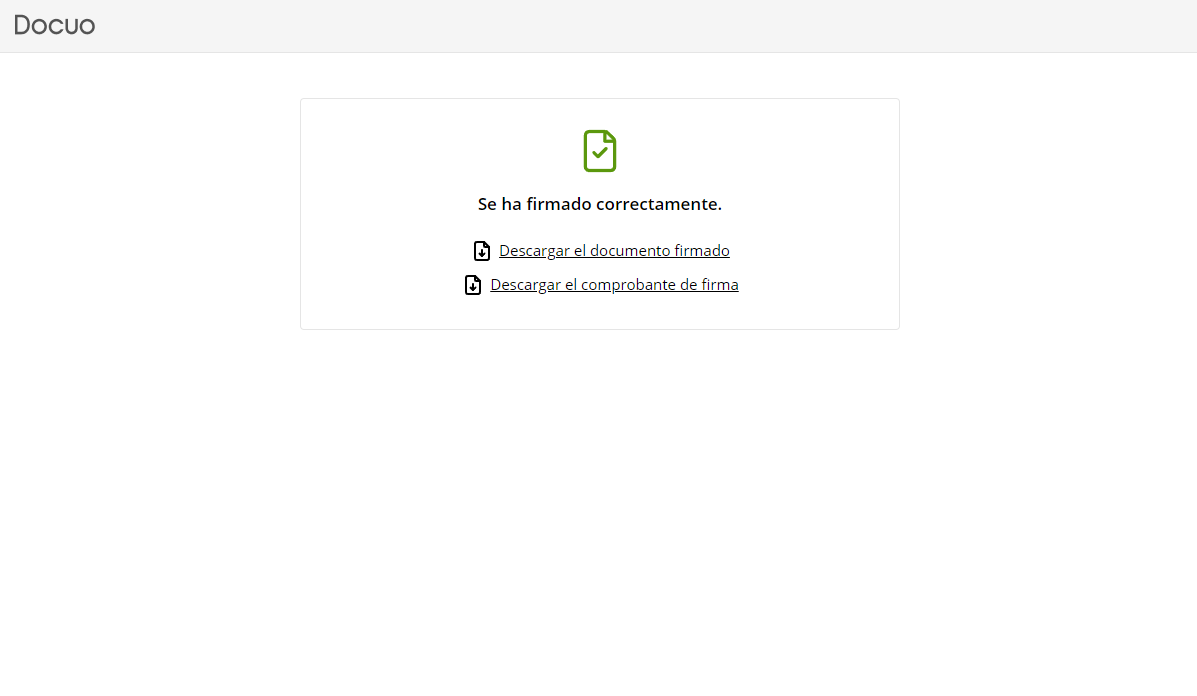
Once you have clicked the sign button, you will be presented with a confirmation window from which you can download the signed document, the signature receipt, or click a “Continue” button that will take you to the appropriate location (as configured on the form):
The appearance and various appearance parameters can be configured in the signature form.
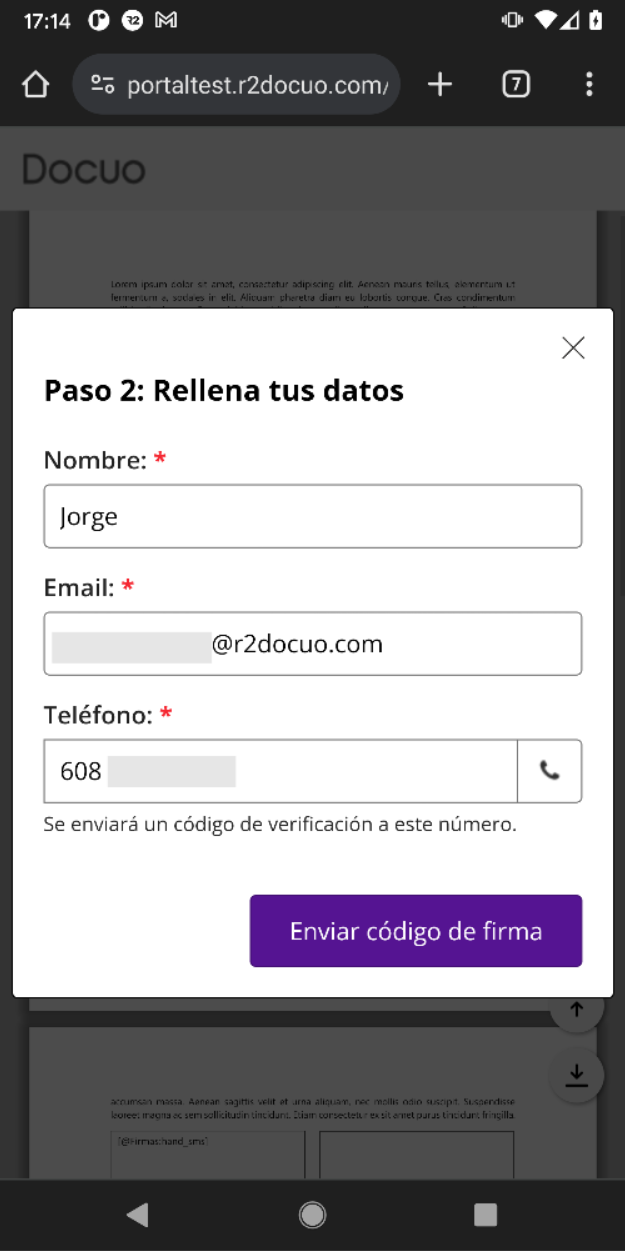
What is the signing experience like on a mobile device?
The recipient receives an email with the form link.
When accessing the link, if an optional security validation is configured for the form (password or two-factor authentication), it must be passed.
Otherwise, or once the authentication has been passed, a simple window will be displayed indicating the steps to be performed:
When the user clicks “Start”, a window for reviewing the document will be displayed:
In the signature fields (if any), the legend “Your signature will go here” will be displayed.
When the user clicks “Next”, if any of the signatory data or additional fields are configured as editable (optional), a window will be displayed where the user can view, enter or change them:
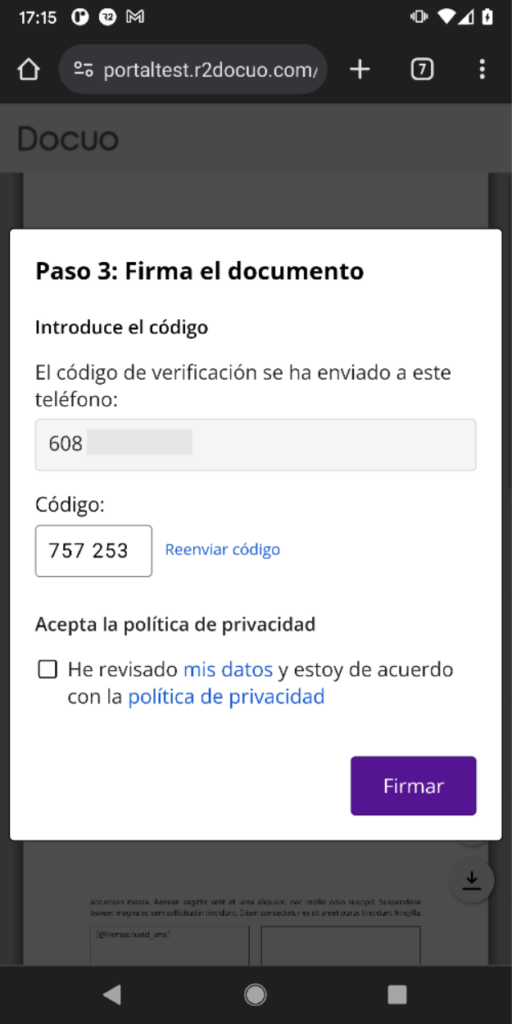
When the user clicks “Next”, he/she will be presented with the signature window where he/she can, depending on how the form has been configured, make a handwritten stroke or enter a PIN code. This example shows the PIN code option sent to the cell phone:
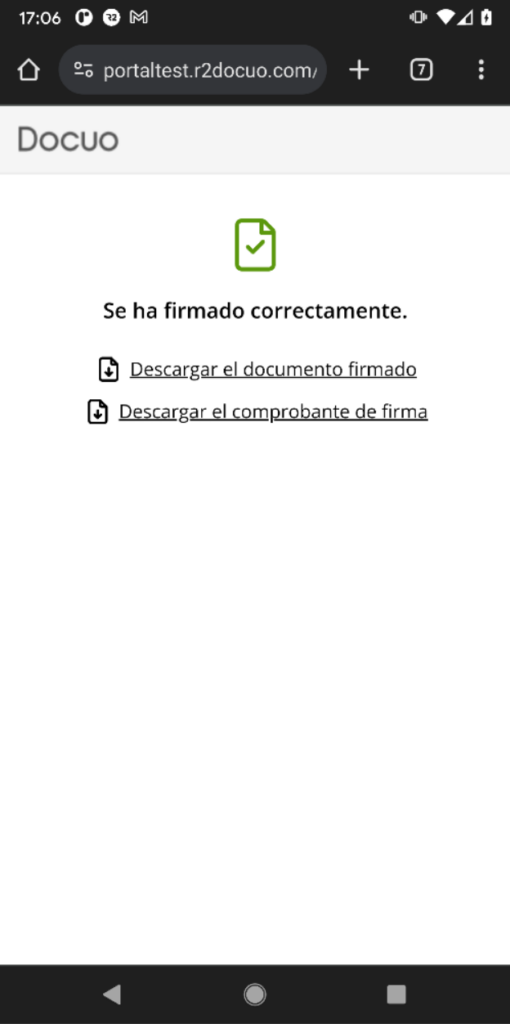
Once you have clicked the sign button, you will be presented with a confirmation window from which you can download the signed document, the signature receipt, or click a “Continue” button that will take you to the appropriate location (as configured on the form):
The appearance and various appearance parameters can be configured in the signature form.