Important technical information for using the Docuo API is provided below:
Authorization of applications and users for API usage
Access to Docuo APIs is done through a protocol called OAuth 2.0[http://tools.ietf.org/html/rfc6749].
OAuth is a standard authorization protocol that allows a third-party application to access Docuo data and/or perform actions on behalf of a user without needing to know the user’s password. Thus, for a third-party application to integrate with Docuo, it is not necessary to share real users or passwords; instead, OAuth acts as a key to allow access to a Docuo repository instead of a user and to be able to act on their behalf.
To authorize third-party application access to a Docuo repository, an administrator must follow the steps below:
1 Open the Docuo options from the main menu of the application:

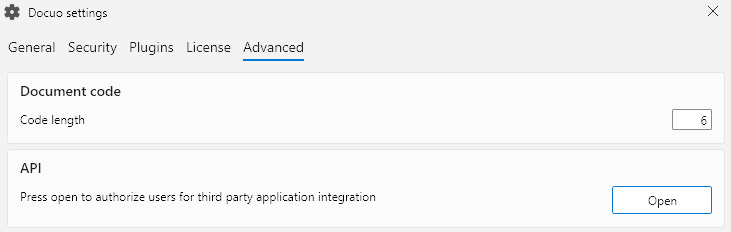
2 In the options window, click on the “Advanced” tab and go to the “API” section, then click on the “Open” button:

3 This button opens a new window with the list of all external applications authorized to access Docuo through the API. Click New to create a new authorization for your application. You can also edit or delete existing external applications from this window:
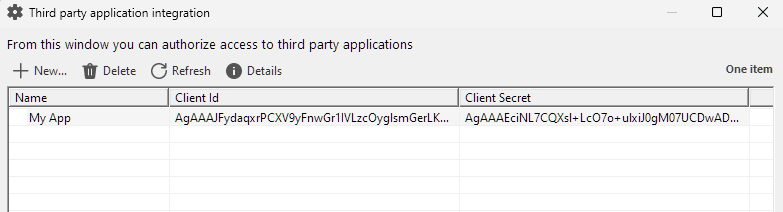
4 When creating a new application, you must give it a name and press Save:
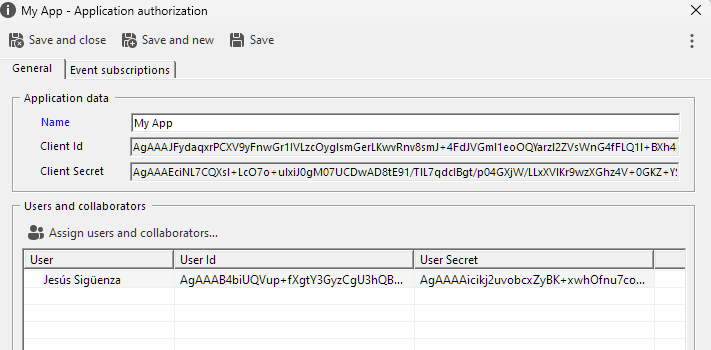
Docuo automatically generates two special strings for that application: client_id and client_secret that must be provided to the developer of the external application. For the newly created application, click New in the Users and Collaborators section to create the authorizations you want to use for the API in this application. For each access, Docuo will generate two other special character strings: user_id and user_secret, which must also be provided to the external application developer.
A Docuo administrator can always revoke authorizations at any time by clicking Remove in the list. In this case, any access to Docuo using these secrets and identifiers is immediately suspended.
Obtaining the Access Token
To log in to the Docuo API, you must follow the OAuth2 password flow in this token URL: https://api.r2docuo.com/oauth2/token
The required parameters are
client_id
The client_id value provided by the Docuo administrator for the application.
client_secret
The value provided by the Docuo administrator for the application.
grant_type
Specified as “password”.
scope
The name of the Docuo repository.
username
The user_id corresponding to the Docuo user.
password
The user_secret corresponding to the Docuo collaborator.
You can send the credentials as Basic Auth Header or in the Body with application/x-www-form-urlencoded.
If the credentials provided are satisfactory. The server will return an application/json response containing the access_token to be provided for each API endpoint call.
The access_token can be sent as a single header or in the Authorization Bearer header.
The complete response will also contain the upgrade token:
{
"access_token": "00DU0000000Io8r!AQcKbNGPff6hW0mfmKH07QiPEGIX",
"token_type": "Bearer",
"expires_in": 120,
"refresh_token": "1/iQI98wWFfJNFWIzs5hrEDDrSiYewe3dFqt5vIV-9ibT9k"
}
Where:
access_token
It is the access token that must be specified in each call within the OAuth protocol.
expires_in
Token lifetime in seconds.
refresh_token
It is the token to be used to acquire a new one in case of expiration.
Token Refreshment
The lifetime of a token is limited from the time it is obtained, counting in seconds the value provided in expires_in.
Attempting to access the API with an expired token will fail. In this case it will be necessary to obtain a new token using the refresh_token provided at login.
The token can be refreshed at any time before it expires. It is highly recommended that your Docuo application, before making an API call, determine if the token is expired in order to proceed to update it before the call returns an error.
Error handling
API calls using OAuth 2.0 access tokens may fail. For example, when the token is not valid, because it has expired or has been revoked. In all these cases you will get an HTTP 4xx error.
Detailed error information can be included in the response header, as shown in the following example:
HTTP/1.1 401 Unauthorized WWW-Authenticate: Bearer realm="example", error="invalid_token", error_description="The access token expired"actually
Context where the error occurred. For information only.
error
Error code. It can be one of the following values:
invalid_request
When a required parameter is missing in the request, it is not well formed. The server will respond with HTTP 400 (Bad Request) status code.
invalid_token
When the token provided is expired, revoked or malformed. The server will respond with HTTP 401 (Unauthorized) status code. In this case the customer can perform a refresh token.
insufficient_scope
When the request requires unavailable privileges. The server will respond with HTTP status code 403 (Forbidden).
error_description
Error description.
When the request does not provide authentication information or uses an unsupported authentication method, the response will NEVER INCLUDE an error code or description:
HTTP/1.1 401 Unauthorized WWW-Authenticate: Bearer realm="ejemplo"Event subscription (Callbacks)
Docuo can be configured to perform callbacks to an external application. Some actions in Docuo generate events that can send information in JSON format via a POST to a preconfigured URL. In order for an external application to subscribe to events in a Docuo repository, an administrator must follow the following steps:
1 Open the Docuo options from the main menu of the application:
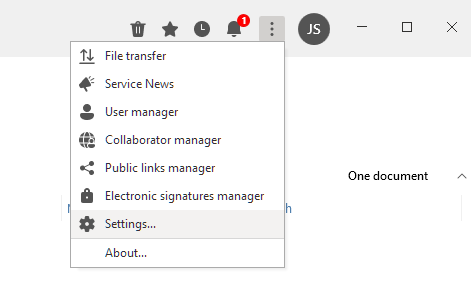
2 In the Options window, go to the “Advanced” tab and find the API section. then click on the “Open” button:
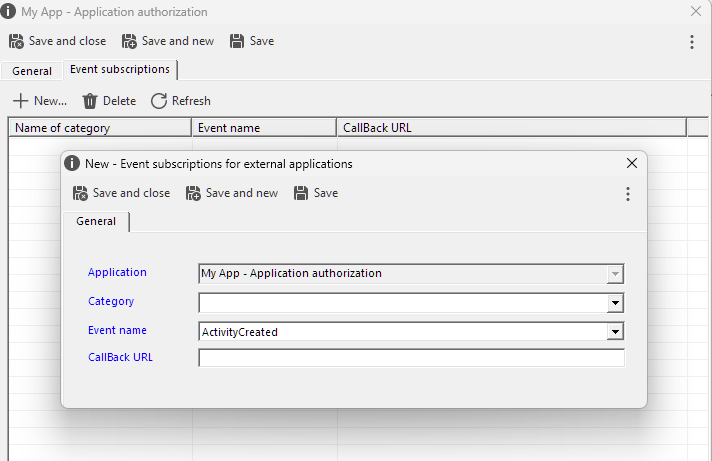
3 This button opens a window with the list of all external applications authorized to access Docuo through the API. Select one and click on Detail to edit your application, then click on the Event Subscription tab.
You can see the list of all preconfigured callbacks of your application. To add an Event click on the New Button: